Linux From Scratch Version 12.3
状态:正在进行
2. Preparing the Host System 2.2 Host System Requirements
Host系统:Ubuntu 24.04.2 LTS
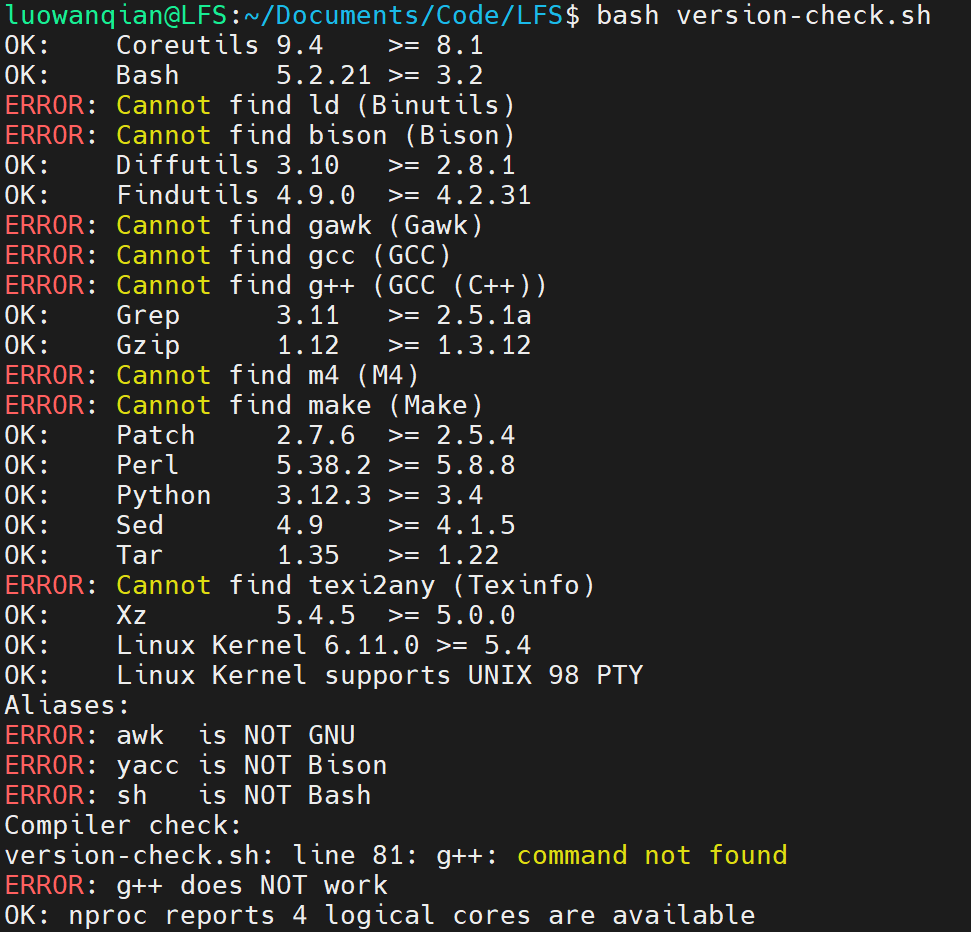
使用教程提供的脚本检查了下依赖包,发现有些依赖未装上
使用apt安装以下包
1
2
3
4
sudo apt install build-essential sudo apt install bison sudo apt install gawk sudo apt install texinfo
检查脚本发现sh不是指向bash,当前指向的是dash
1 lrwxrwxrwx 1 root root 4 Mar 31 2024 /bin/sh -> dash*
使用ln命令修改指向
1 sudo ln -sf /bin/bash /bin/sh
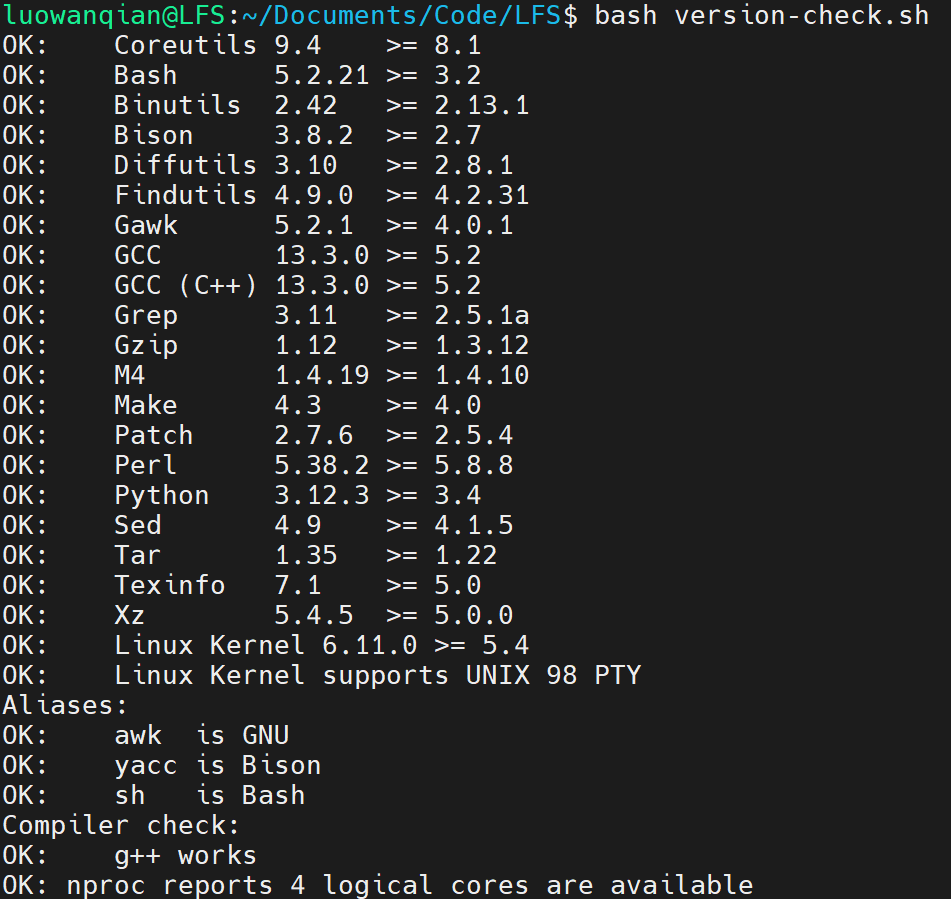
安装完依赖后效果如下
2.3. Building LFS in Stages 先Mark住,重启系统后要恢复的操作
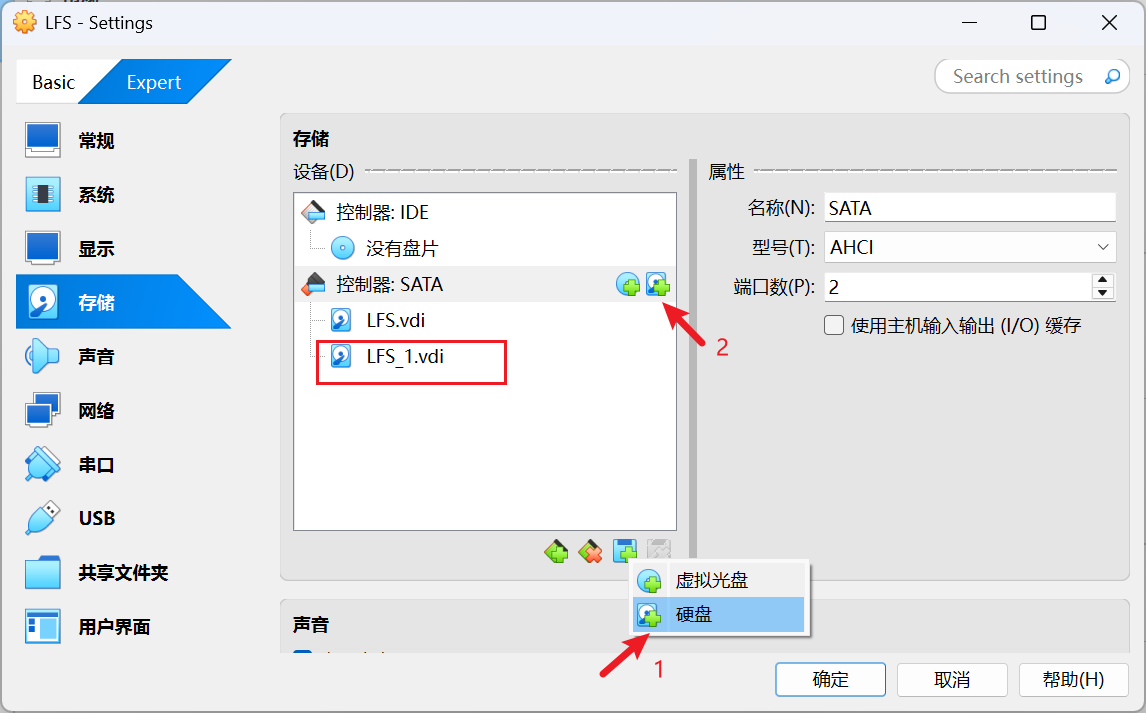
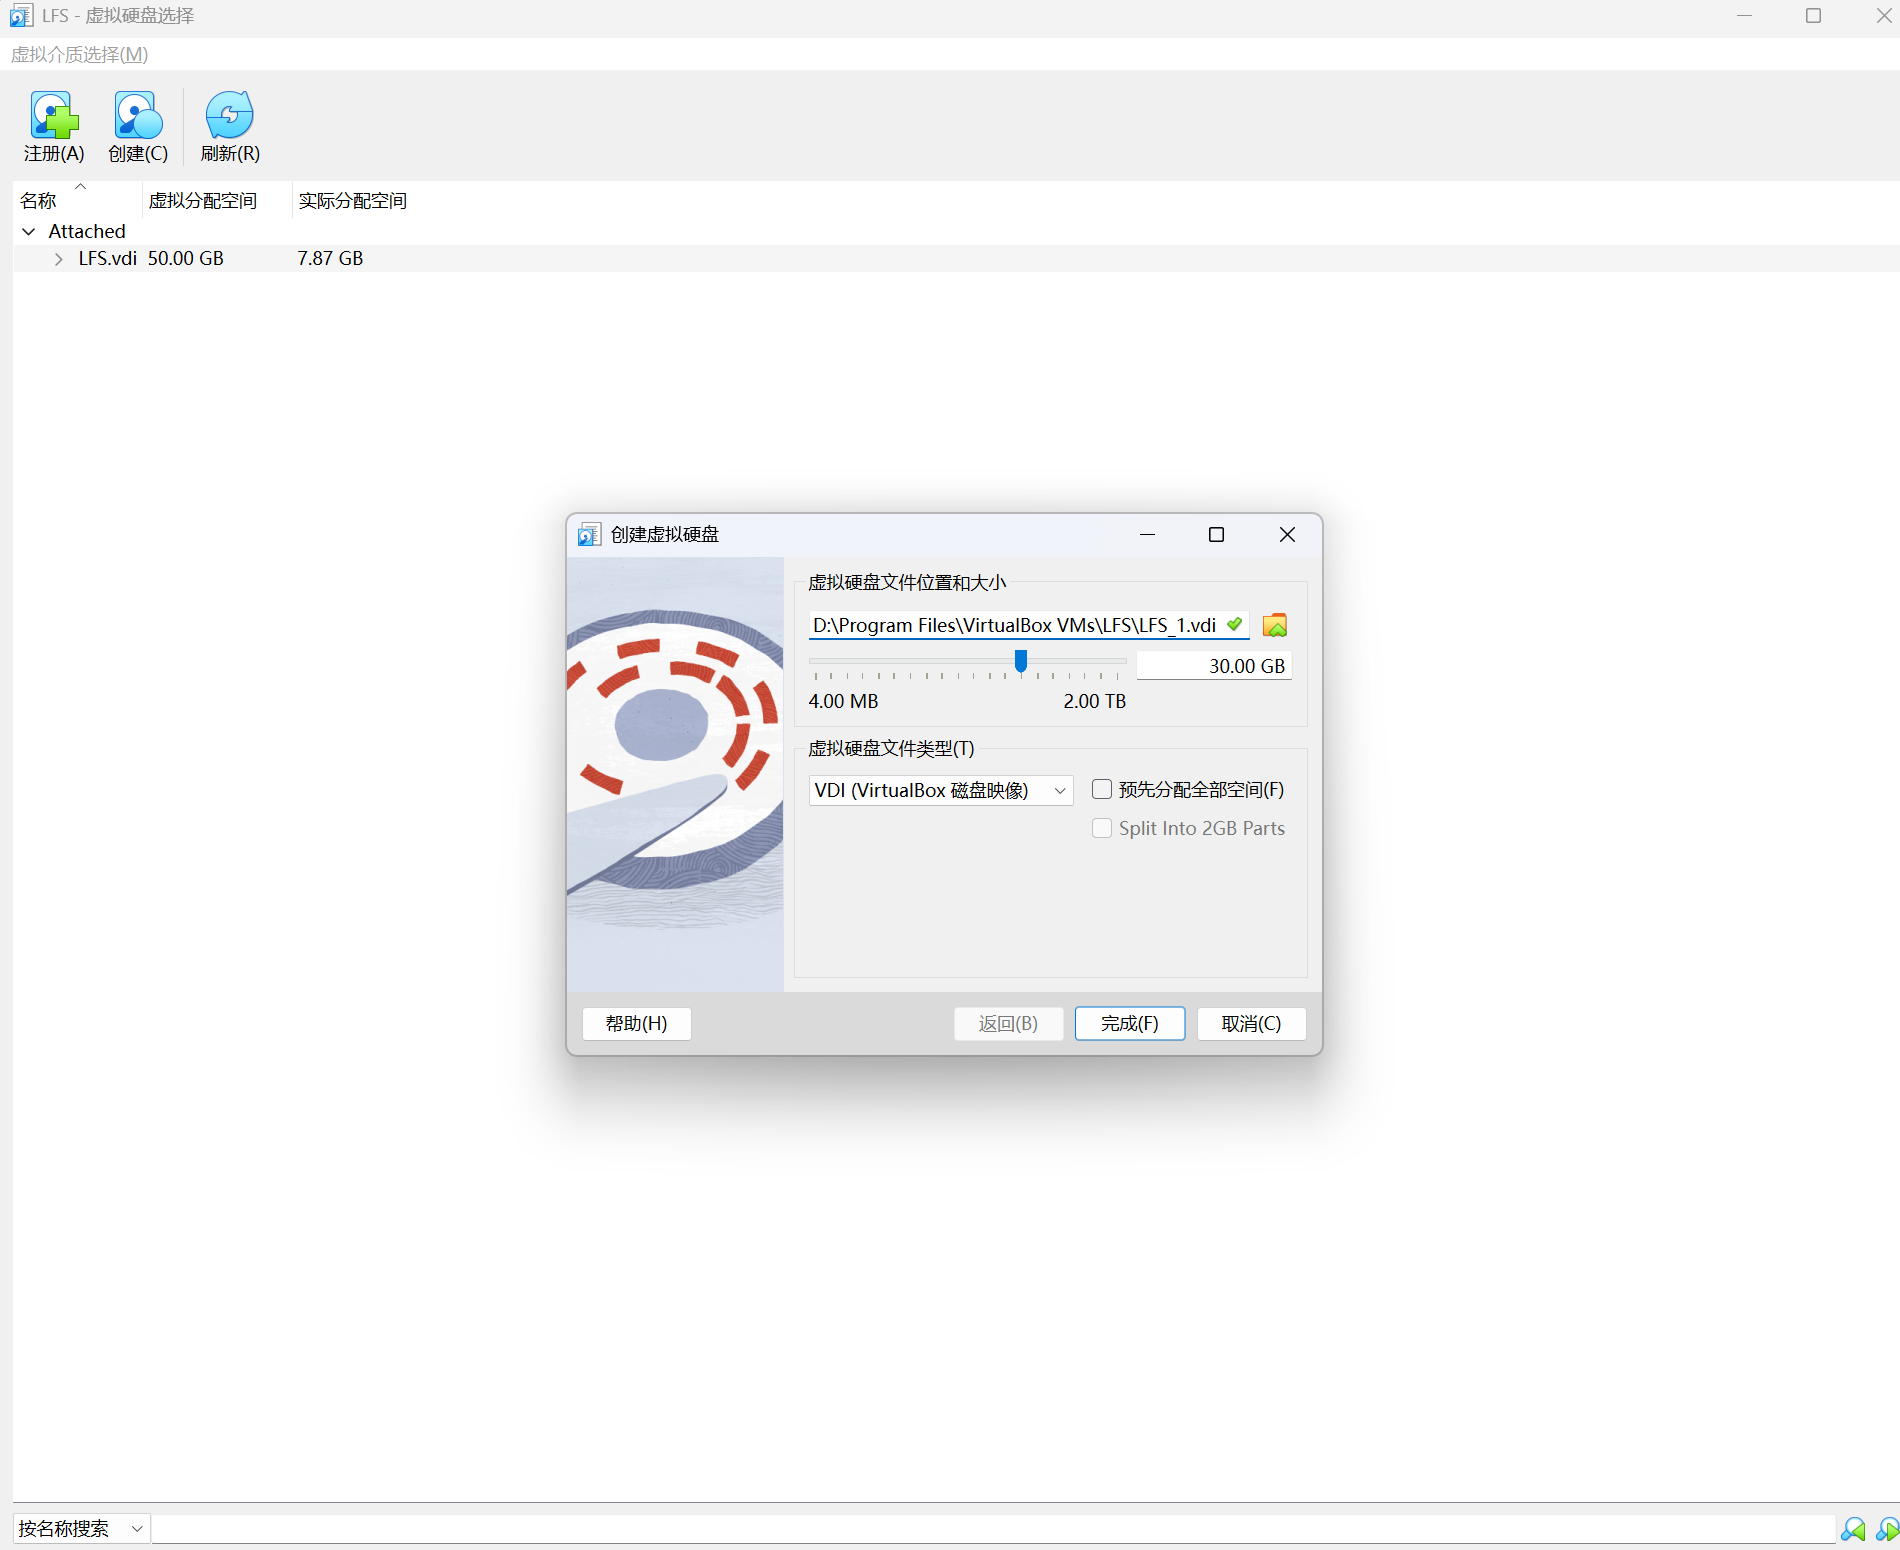
2.4 Creating a New Partition VirtualBox创建硬盘 LFS教程指示需要创建一个分区,当前Host系统是运行在VirtualBox上,因此这里创建一个新的硬盘用于新分区创建
创建分区
1
2
3
4
5
6
7
8
9
10
11
12
13
14
15
16
17
luowanqian@LFS:~$ lsblk NAME MAJ:MIN RM SIZE RO TYPE MOUNTPOINTS loop0 7:0 0 73.9M 1 loop /snap/core22/1748 loop1 7:1 0 4K 1 loop /snap/bare/5 loop2 7:2 0 11.1M 1 loop /snap/firmware-updater/167 loop3 7:3 0 516M 1 loop /snap/gnome-42-2204/202 loop4 7:4 0 258M 1 loop /snap/firefox/5751 loop5 7:5 0 91.7M 1 loop /snap/gtk-common-themes/1535 loop6 7:6 0 10.8M 1 loop /snap/snap-store/1248 loop7 7:7 0 44.4M 1 loop /snap/snapd/23771 loop8 7:8 0 44.4M 1 loop /snap/snapd/23545 loop9 7:9 0 568K 1 loop /snap/snapd-desktop-integration/253 sda 8:0 0 50G 0 disk ├─sda1 8:1 0 1M 0 part └─sda2 8:2 0 50G 0 part / sdb 8:16 0 30G 0 disk sr0 11:0 1 1024M 0 rom
fdisk查看硬盘/dev/sdb信息,当前空间大小为30GB
1
2
3
4
5
6
luowanqian@LFS:~$ sudo fdisk -l /dev/sdb Disk /dev/sdb: 30 GiB, 32212254720 bytes, 62914560 sectors Disk model: VBOX HARDDISK Units: sectors of 1 * 512 = 512 bytes Sector size (logical/physical): 512 bytes / 512 bytes I/O size (minimum/optimal): 512 bytes / 512 bytes
1
2
3
4
5
6
7
8
9
10
11
12
13
14
15
16
17
18
19
20
21
22
23
24
25
26
27
28
29
30
31
32
33
34
35
36
37
38
39
40
41
42
43
44
45
46
47
48
49
50
51
52
53
54
55
56
57
luowanqian@LFS:~$ sudo fdisk /dev/sdb Welcome to fdisk (util-linux 2.39.3). Changes will remain in memory only, until you decide to write them. Be careful before using the write command. Device does not contain a recognized partition table. Created a new DOS (MBR) disklabel with disk identifier 0x4dd1e2d5. Command (m for help): p Disk /dev/sdb: 30 GiB, 32212254720 bytes, 62914560 sectors Disk model: VBOX HARDDISK Units: sectors of 1 * 512 = 512 bytes Sector size (logical/physical): 512 bytes / 512 bytes I/O size (minimum/optimal): 512 bytes / 512 bytes Disklabel type: dos Disk identifier: 0x4dd1e2d5 Command (m for help): q luowanqian@LFS:~$ luowanqian@LFS:~$ luowanqian@LFS:~$ sudo fdisk /dev/sdb Welcome to fdisk (util-linux 2.39.3). Changes will remain in memory only, until you decide to write them. Be careful before using the write command. Device does not contain a recognized partition table. Created a new DOS (MBR) disklabel with disk identifier 0x7fdee095. Command (m for help): g Created a new GPT disklabel (GUID: 44B24C46-37DF-4C7C-9C00-ACD7C1FED25F). Command (m for help): n Partition number (1-128, default 1): First sector (2048-62914526, default 2048): Last sector, +/-sectors or +/-size{K,M,G,T,P} (2048-62914526, default 62912511): Created a new partition 1 of type 'Linux filesystem' and of size 30 GiB. Command (m for help): p Disk /dev/sdb: 30 GiB, 32212254720 bytes, 62914560 sectors Disk model: VBOX HARDDISK Units: sectors of 1 * 512 = 512 bytes Sector size (logical/physical): 512 bytes / 512 bytes I/O size (minimum/optimal): 512 bytes / 512 bytes Disklabel type: gpt Disk identifier: 44B24C46-37DF-4C7C-9C00-ACD7C1FED25F Device Start End Sectors Size Type /dev/sdb1 2048 62912511 62910464 30G Linux filesystem Command (m for help): w The partition table has been altered. Calling ioctl() to re-read partition table. Syncing disks.
查看/dev/sdb的分区情况,可以看到已有一个分区
1
2
3
4
5
6
7
8
9
10
11
luowanqian@LFS:~$ sudo fdisk -l /dev/sdb Disk /dev/sdb: 30 GiB, 32212254720 bytes, 62914560 sectors Disk model: VBOX HARDDISK Units: sectors of 1 * 512 = 512 bytes Sector size (logical/physical): 512 bytes / 512 bytes I/O size (minimum/optimal): 512 bytes / 512 bytes Disklabel type: gpt Disk identifier: 44B24C46-37DF-4C7C-9C00-ACD7C1FED25F Device Start End Sectors Size Type /dev/sdb1 2048 62912511 62910464 30G Linux filesystem
2.5 Creating a File System on the Partition
1
2
3
4
5
6
7
8
9
10
11
12
13
14
15
16
17
18
19
20
21
22
23
24
luowanqian@LFS:~/Documents/Code/LFS$ sudo mkfs -v -t ext4 /dev/sdb1 mke2fs 1.47.0 (5-Feb-2023) fs_types for mke2fs.conf resolution: 'ext4' Filesystem label= OS type: Linux Block size=4096 (log=2) Fragment size=4096 (log=2) Stride=0 blocks, Stripe width=0 blocks 1966080 inodes, 7863808 blocks 393190 blocks (5.00%) reserved for the super user First data block=0 Maximum filesystem blocks=2155872256 240 block groups 32768 blocks per group, 32768 fragments per group 8192 inodes per group Filesystem UUID: e24fc955-4016-4b3c-9ef3-712469fb2434 Superblock backups stored on blocks: 32768, 98304, 163840, 229376, 294912, 819200, 884736, 1605632, 2654208, 4096000 Allocating group tables: done Writing inode tables: done Creating journal (32768 blocks): done Writing superblocks and filesystem accounting information: done
2.6 Setting the $LFS Variable and the Umask 为了系统重启后能够设置$LFS环境变量和umask,需要写入.bash_profile和.bashrc配置文件,按照教程说法,需要设置当前登录用户和root的配置文件
1
2
3
4
5
6
7
8
9
10
11
12
13
14
15
touch ~/.bash_profile cat >> ~/.bash_profile << "EOF" export LFS=/mnt/lfs umask 022 EOF cat >> ~/.bashrc << "EOF" if [ -f ~/.bash_profile ]; then . ~/.bash_profile fi EOF source ~/.bashrc
1
2
3
4
5
6
7
8
9
10
11
12
13
sudo touch /root/.bash_profile sudo bash -c 'cat >> /root/.bash_profile << "EOF" export LFS=/mnt/lfs umask 022 EOF' sudo bash -c 'cat >> /root/.bashrc << "EOF" if [ -f /root/.bash_profile ]; then . /root/.bash_profile fi EOF'
备注:使用sudo cat写入root配置文件需要用bash -c,参考 sudo cat << EOF > File doesn’t work, sudo su does 做法
2.7 Mounting the New Partition 为了重启后能自动挂载,在/etc/fstab文件中新增一行,启动时自动挂载文件系统/dev/sdb1到目录/mnt/lfs
1
2
3
4
5
6
7
8
9
10
luowanqian@LFS:~/Documents/Code/LFS$ cat /etc/fstab # /etc/fstab: static file system information. # # device; this may be used with UUID= as a more robust way to name devices # that works even if disks are added and removed. See fstab(5). # # / was on /dev/sda2 during curtin installation /dev/sdb1 /mnt/lfs ext4 defaults 1 1
挂载成功后,使用df查看挂载(见最后一行输出)
1
2
3
4
5
6
7
8
9
luowanqian@LFS:~/Documents/Code/LFS$ df -h Filesystem Size Used Avail Use% Mounted on tmpfs 776M 1.4M 774M 1% /run /dev/sda2 49G 6.1G 41G 14% / tmpfs 3.8G 0 3.8G 0% /dev/shm tmpfs 5.0M 8.0K 5.0M 1% /run/lock tmpfs 776M 96K 775M 1% /run/user/120 tmpfs 776M 104K 775M 1% /run/user/1000 /dev/sdb1 30G 24K 28G 1% /mnt/lfs
3. Packages and Patches 3.1 Introduction 本节内容主要是说明软件包下载事项:
下载教程中指定版本的软件包
下载release tar包而不是Git的snapshot
准备工作
创建工作目录$LFS/sources,修改目录权限
1
2
3
4
luowanqian@LFS:~$ sudo mkdir -v $LFS/sources mkdir: created directory '/mnt/lfs/sources' luowanqian@LFS:~$ sudo chmod -v a+wt $LFS/sources mode of '/mnt/lfs/sources' changed from 0755 (rwxr-xr-x) to 1777 (rwxrwxrwt)
1 wget https://www.linuxfromscratch.org/lfs/view/stable/wget-list-sysv
(可选)替换软件包下载地址为LFS mirror地址
LFS提供了一些mirror,见 https://www.linuxfromscratch.org/mirrors.html#files ,网络不好可以设置软件包下载地址为LFS mirror地址。这里使用awk替换wget-list-sysv文件中的url
1 awk -F'/' '{print "https://mirrors.ustc.edu.cn/lfs/lfs-packages/12.3/" $NF}' wget-list-sysv > replaced-wget-list-sysv
使用wget下载软件包到目录$LFS/sources中
1
2
3
4
wget --input-file=wget-list-sysv --continue --directory-prefix=$LFS/sources # 或者 wget --input-file=replaced-wget-list-sysv --continue --directory-prefix=$LFS/sources
1 wget -P $LFS/sources https://www.linuxfromscratch.org/lfs/view/stable/md5sums
1
2
3
pushd $LFS/sources md5sum -c md5sums popd
1 sudo chown root:root $LFS/sources/*
4. Final Preparations 4.2 Creating a Limited Directory Layout in the LFS Filesystem 执行以下命令,在$LFS中创建一些子目录用构建
1
2
3
4
5
6
7
8
9
10
11
12
13
14
15
16
17
18
cat > prepare-dir.sh << "EOF" # !/bin/bash echo "LFS dir: $LFS" mkdir -pv $LFS/{etc,var} $LFS/usr/{bin,lib,sbin} for i in bin lib sbin; do ln -sv usr/$i $LFS/$i done case $(uname -m) in x86_64) mkdir -pv $LFS/lib64 ;; esac mkdir -pv $LFS/tools EOF sudo bash -i prepare-dir.sh
4.3 Adding the LFS User
1
2
sudo groupadd lfs sudo useradd -s /bin/bash -g lfs -m -k /dev/null lfs
1
2
3
4
5
6
sudo su chown -v lfs $LFS/{usr{,/*},var,etc,tools} case $(uname -m) in x86_64) chown -v lfs $LFS/lib64 ;; esac
4.4 Setting Up the Environment
切换到用户lfs,创建bash配置文件.bash_profile
1
2
3
cat > ~/.bash_profile << "EOF" exec env -i HOME=$HOME TERM=$TERM PS1='\u:\w\$ ' /bin/bash EOF
逻辑:当(1)以lfs用户登录系统(2)用su - lfs切换到lfs用户,initial shell是一个login shell,会依次读取/etc/profile和~/.bash_profile。上面的.bash_profile此时会创建一个empty环境,只保HOME 、TERM 和PS1 环境变量,然后切换到non-login shell,去执行~/.bashrc的配置
1
2
3
4
5
6
7
8
9
10
11
12
cat > ~/.bashrc << "EOF" set +h umask 022 LFS=/mnt/lfs LC_ALL=POSIX LFS_TGT=$(uname -m)-lfs-linux-gnu PATH=/usr/bin if [ ! -L /bin ]; then PATH=/bin:$PATH; fi PATH=$LFS/tools/bin:$PATH CONFIG_SITE=$LFS/usr/share/config.site export LFS LC_ALL LFS_TGT PATH CONFIG_SITE EOF
逻辑:如果当前是non-login shell,则会执行~/.bashrc,不执行/etc/profile和~/.bash_profile,因此.bashrc要设置构建需要的环境变量
检查/etc/bash.bashrc是否存在,如果存在则需要将该文件换一个路径。切换到root用户
1 [ ! -e /etc/bash.bashrc ] || mv -v /etc/bash.bashrc /etc/bash.bashrc.NOUSE
1
2
3
cat >> ~/.bashrc << "EOF" export MAKEFLAGS=-j$(nproc) EOF
检查环境变量设置是否符合预期(每次重启登录lfs用户时都检查下)
1
2
3
4
5
6
7
8
9
10
11
12
13
lfs:~$ env PWD=/home/lfs HOME=/home/lfs MAKEFLAGS=-j4 TERM=tmux-256color SHLVL=1 PS1=\u:\w\$ LFS_TGT=x86_64-lfs-linux-gnu LC_ALL=POSIX LFS=/mnt/lfs CONFIG_SITE=/mnt/lfs/usr/share/config.site PATH=/mnt/lfs/tools/bin:/usr/bin _=/usr/bin/env
4.5 About SBUs 只是一些构建时间说明
Important Preliminary Material 介绍交叉编译基础知识
III. General Compilation Instructions 在实操Chapter 5和Chapter 6内容之前,需要进行环境检查
后续编译需要在$LFS/sources目录中进行
5.2 Binutils-2.44 - Pass 1
1
2
3
4
tar -xvf binutils-2.44.tar.xz cd binutils-2.44 mkdir -v build cd build
1
2
3
4
5
6
7
8
9
10
11
../configure --prefix=$LFS/tools \ --with-sysroot=$LFS \ --target=$LFS_TGT \ --disable-nls \ --enable-gprofng=no \ --disable-werror \ --enable-new-dtags \ --enable-default-hash-style=gnu make make install
5.3 GCC-14.2.0 - Pass 1
1
2
tar -xvf gcc-14.2.0.tar.xz cd gcc-14.2.0
1
2
3
4
5
6
tar -xf ../mpfr-4.2.1.tar.xz mv -v mpfr-4.2.1 mpfr tar -xf ../gmp-6.3.0.tar.xz mv -v gmp-6.3.0 gmp tar -xf ../mpc-1.3.1.tar.gz mv -v mpc-1.3.1 mpc
On x86_64 hosts, set the default directory name for 64-bit libraries to “lib”:
1
2
3
4
5
6
case $(uname -m) in x86_64) sed -e '/m64=/s/lib64/lib/' \ -i.orig gcc/config/i386/t-linux64 ;; esac
1 2 3 4 5 6 7 8 9 10 11 12 13 14 15 16 17 18 19 20 ../configure \ --target=$LFS_TGT \ --prefix=$LFS/tools \ --with-glibc-version=2.41 \ --with-sysroot=$LFS \ --with-newlib \ --without-headers \ --enable-default-pie \ --enable-default-ssp \ --disable-nls \ --disable-shared \ --disable-multilib \ --disable-threads \ --disable-libatomic \ --disable-libgomp \ --disable-libquadmath \ --disable-libssp \ --disable-libvtv \ --disable-libstdcxx \ --enable-languages=c,c++
拷贝limit.h。当前已在build目录中,需要cd到gcc源码目录
1 2 3 cd .. cat gcc/limitx.h gcc/glimits.h gcc/limity.h > \ `dirname $($LFS_TGT-gcc -print-libgcc-file-name)`/include/limits.h
1 2 tar -xvf linux-6.13.4.tar.xz cd linux-6.13.4
提取kernel headers,拷贝到$LFS/usr
1 2 3 make headers find usr/include -type f ! -name '*.h' -delete cp -rv usr/include $LFS/usr
第二步是删除usr/include除了*.h以外的文件,即只保留头文件
5.5 Glibc-2.41
1
2
tar -xvf glibc-2.41.tar.xz cd glibc-2.41
1 2 3 4 5 6 7 case $(uname -m) in i?86) ln -sfv ld-linux.so.2 $LFS/lib/ld-lsb.so.3 ;; x86_64) ln -sfv ../lib/ld-linux-x86-64.so.2 $LFS/lib64 ln -sfv ../lib/ld-linux-x86-64.so.2 $LFS/lib64/ld-lsb-x86-64.so.3 ;; esac
1 patch -Np1 -i ../glibc-2.41-fhs-1.patch
Ensure that the ldconfig and sln utilities are installed into /usr/sbin
1 echo "rootsbindir=/usr/sbin" > configparms
1 2 3 4 5 6 7 8 ../configure \ --prefix=/usr \ --host=$LFS_TGT \ --build=$(../scripts/config.guess) \ --enable-kernel=5.4 \ --with-headers=$LFS/usr/include \ --disable-nscd \ libc_cv_slibdir=/usr/lib
1 make DESTDIR=$LFS install
Fix a hard coded path to the executable loader in the ldd script
1 sed '/RTLDLIST=/s@/usr@@g' -i $LFS/usr/bin/ldd
1 2 echo 'int main(){}' | $LFS_TGT-gcc -xc - readelf -l a.out | grep ld-linux
正确安装Glibc,会看到以下输出
1 [Requesting program interpreter: /lib64/ld-linux-x86-64.so.2]
删除临时文件a.out
5.6 Libstdc++ from GCC-14.2.0 因为Libstdc++是gcc一部分,需要重新在gcc源码目录中构建
1 2 3 4 cd gcc-14.2.0 rm -rfv build mkdir -v build cd build
1 2 3 4 5 6 7 8 ../libstdc++-v3/configure \ --host=$LFS_TGT \ --build=$(../config.guess) \ --prefix=/usr \ --disable-multilib \ --disable-nls \ --disable-libstdcxx-pch \ --with-gxx-include-dir=/tools/$LFS_TGT/include/c++/14.2.0
确保环境变量$LFS设置正确
1 make DESTDIR=$LFS install
Remove the libtool archive files because they are harmful for cross-compilation
1 rm -v $LFS/usr/lib/lib{stdc++{,exp,fs},supc++}.la
后续编译需要在$LFS/sources目录中进行,同时确保当前用户为lfs
1 2 su - lfs cd $LFS/sources/
6.2 M4-1.4.19
1 2 tar -xvf m4-1.4.19.tar.xz cd m4-1.4.19
1 2 3 ./configure --prefix=/usr \ --host=$LFS_TGT \ --build=$(build-aux/config.guess)
1 2 make make DESTDIR=$LFS install
6.3 Ncurses-6.5
1 2 tar -xvf ncurses-6.5.tar.gz cd ncurses-6.5
1 2 3 4 5 6 mkdir build pushd build ../configure AWK=gawk make -C include make -C progs tic popd
1 2 3 4 5 6 7 8 9 10 11 12 ./configure --prefix=/usr \ --host=$LFS_TGT \ --build=$(./config.guess) \ --mandir=/usr/share/man \ --with-manpage-format=normal \ --with-shared \ --without-normal \ --with-cxx-shared \ --without-debug \ --without-ada \ --disable-stripping \ AWK=gawk
1 2 3 4 make DESTDIR=$LFS TIC_PATH=$(pwd)/build/progs/tic install ln -sv libncursesw.so $LFS/usr/lib/libncurses.so sed -e 's/^#if.*XOPEN.*$/#if 1/' \ -i $LFS/usr/include/curses.h
6.4 Bash-5.2.37
1 2 tar -xzvf bash-5.2.37.tar.gz cd bash-5.2.37
1 2 3 4 ./configure --prefix=/usr \ --build=$(sh support/config.guess) \ --host=$LFS_TGT \ --without-bash-malloc
1 2 make make DESTDIR=$LFS install
LFS End 完成LFS教程后,需要回滚的操作如下:
4.4节的/etc/bash.bashrc文件还原


