袋熊的树洞

日拱一卒,功不唐捐

0%

Linux From Scratch

Version 12.3

状态:正在进行

2. Preparing the Host System

2.2 Host System Requirements

Host系统:Ubuntu 24.04.2 LTS

使用教程提供的脚本检查了下依赖包,发现有些依赖未装上

使用apt安装以下包

1
2
3
4
sudo apt install build-essential
sudo apt install bison
sudo apt install gawk
sudo apt install texinfo

检查脚本发现sh不是指向bash,当前指向的是dash

1
lrwxrwxrwx 1 root root 4 Mar 31  2024 /bin/sh -> dash*

使用ln命令修改指向

1
sudo ln -sf /bin/bash /bin/sh

安装完依赖后效果如下

2.3. Building LFS in Stages

先Mark住,重启系统后要恢复的操作

2.4 Creating a New Partition

VirtualBox创建硬盘

LFS教程指示需要创建一个分区,当前Host系统是运行在VirtualBox上,因此这里创建一个新的硬盘用于新分区创建

  • 在设置存储中创建新的硬盘,然后注册进来

  • 硬盘大小设置为30GB(LFS教程建议)

创建分区

  • 列出系统已识别的硬盘
1
2
3
4
5
6
7
8
9
10
11
12
13
14
15
16
17
luowanqian@LFS:~$ lsblk
NAME MAJ:MIN RM SIZE RO TYPE MOUNTPOINTS
loop0 7:0 0 73.9M 1 loop /snap/core22/1748
loop1 7:1 0 4K 1 loop /snap/bare/5
loop2 7:2 0 11.1M 1 loop /snap/firmware-updater/167
loop3 7:3 0 516M 1 loop /snap/gnome-42-2204/202
loop4 7:4 0 258M 1 loop /snap/firefox/5751
loop5 7:5 0 91.7M 1 loop /snap/gtk-common-themes/1535
loop6 7:6 0 10.8M 1 loop /snap/snap-store/1248
loop7 7:7 0 44.4M 1 loop /snap/snapd/23771
loop8 7:8 0 44.4M 1 loop /snap/snapd/23545
loop9 7:9 0 568K 1 loop /snap/snapd-desktop-integration/253
sda 8:0 0 50G 0 disk
├─sda1 8:1 0 1M 0 part
└─sda2 8:2 0 50G 0 part /
sdb 8:16 0 30G 0 disk
sr0 11:0 1 1024M 0 rom
  • fdisk查看硬盘/dev/sdb信息,当前空间大小为30GB
1
2
3
4
5
6
luowanqian@LFS:~$ sudo fdisk -l /dev/sdb
Disk /dev/sdb: 30 GiB, 32212254720 bytes, 62914560 sectors
Disk model: VBOX HARDDISK
Units: sectors of 1 * 512 = 512 bytes
Sector size (logical/physical): 512 bytes / 512 bytes
I/O size (minimum/optimal): 512 bytes / 512 bytes
  • 创建分区,当前只创建一个分区
1
2
3
4
5
6
7
8
9
10
11
12
13
14
15
16
17
18
19
20
21
22
23
24
25
26
27
28
29
30
31
32
33
34
35
36
37
38
39
40
41
42
43
44
45
46
47
48
49
50
51
52
53
54
55
56
57
luowanqian@LFS:~$ sudo fdisk /dev/sdb

Welcome to fdisk (util-linux 2.39.3).
Changes will remain in memory only, until you decide to write them.
Be careful before using the write command.

Device does not contain a recognized partition table.
Created a new DOS (MBR) disklabel with disk identifier 0x4dd1e2d5.

Command (m for help): p
Disk /dev/sdb: 30 GiB, 32212254720 bytes, 62914560 sectors
Disk model: VBOX HARDDISK
Units: sectors of 1 * 512 = 512 bytes
Sector size (logical/physical): 512 bytes / 512 bytes
I/O size (minimum/optimal): 512 bytes / 512 bytes
Disklabel type: dos
Disk identifier: 0x4dd1e2d5

Command (m for help): q

luowanqian@LFS:~$
luowanqian@LFS:~$
luowanqian@LFS:~$ sudo fdisk /dev/sdb

Welcome to fdisk (util-linux 2.39.3).
Changes will remain in memory only, until you decide to write them.
Be careful before using the write command.

Device does not contain a recognized partition table.
Created a new DOS (MBR) disklabel with disk identifier 0x7fdee095.

Command (m for help): g
Created a new GPT disklabel (GUID: 44B24C46-37DF-4C7C-9C00-ACD7C1FED25F).

Command (m for help): n
Partition number (1-128, default 1):
First sector (2048-62914526, default 2048):
Last sector, +/-sectors or +/-size{K,M,G,T,P} (2048-62914526, default 62912511):

Created a new partition 1 of type 'Linux filesystem' and of size 30 GiB.

Command (m for help): p
Disk /dev/sdb: 30 GiB, 32212254720 bytes, 62914560 sectors
Disk model: VBOX HARDDISK
Units: sectors of 1 * 512 = 512 bytes
Sector size (logical/physical): 512 bytes / 512 bytes
I/O size (minimum/optimal): 512 bytes / 512 bytes
Disklabel type: gpt
Disk identifier: 44B24C46-37DF-4C7C-9C00-ACD7C1FED25F

Device Start End Sectors Size Type
/dev/sdb1 2048 62912511 62910464 30G Linux filesystem

Command (m for help): w
The partition table has been altered.
Calling ioctl() to re-read partition table.
Syncing disks.

查看/dev/sdb的分区情况,可以看到已有一个分区

1
2
3
4
5
6
7
8
9
10
11
luowanqian@LFS:~$ sudo fdisk -l /dev/sdb
Disk /dev/sdb: 30 GiB, 32212254720 bytes, 62914560 sectors
Disk model: VBOX HARDDISK
Units: sectors of 1 * 512 = 512 bytes
Sector size (logical/physical): 512 bytes / 512 bytes
I/O size (minimum/optimal): 512 bytes / 512 bytes
Disklabel type: gpt
Disk identifier: 44B24C46-37DF-4C7C-9C00-ACD7C1FED25F

Device Start End Sectors Size Type
/dev/sdb1 2048 62912511 62910464 30G Linux filesystem

2.5 Creating a File System on the Partition

  • 在新分区/dev/sdb1上创建文件系统ext4
1
2
3
4
5
6
7
8
9
10
11
12
13
14
15
16
17
18
19
20
21
22
23
24
luowanqian@LFS:~/Documents/Code/LFS$ sudo mkfs -v -t ext4 /dev/sdb1
mke2fs 1.47.0 (5-Feb-2023)
fs_types for mke2fs.conf resolution: 'ext4'
Filesystem label=
OS type: Linux
Block size=4096 (log=2)
Fragment size=4096 (log=2)
Stride=0 blocks, Stripe width=0 blocks
1966080 inodes, 7863808 blocks
393190 blocks (5.00%) reserved for the super user
First data block=0
Maximum filesystem blocks=2155872256
240 block groups
32768 blocks per group, 32768 fragments per group
8192 inodes per group
Filesystem UUID: e24fc955-4016-4b3c-9ef3-712469fb2434
Superblock backups stored on blocks:
32768, 98304, 163840, 229376, 294912, 819200, 884736, 1605632, 2654208,
4096000

Allocating group tables: done
Writing inode tables: done
Creating journal (32768 blocks): done
Writing superblocks and filesystem accounting information: done

2.6 Setting the $LFS Variable and the Umask

为了系统重启后能够设置$LFS环境变量和umask,需要写入.bash_profile.bashrc配置文件,按照教程说法,需要设置当前登录用户和root的配置文件

  • 配置登录用户的bash
1
2
3
4
5
6
7
8
9
10
11
12
13
14
15
touch ~/.bash_profile

cat >> ~/.bash_profile << "EOF"
export LFS=/mnt/lfs
umask 022
EOF

cat >> ~/.bashrc << "EOF"

if [ -f ~/.bash_profile ]; then
. ~/.bash_profile
fi
EOF

source ~/.bashrc
  • 配置root用户的bash
1
2
3
4
5
6
7
8
9
10
11
12
13
sudo touch /root/.bash_profile

sudo bash -c 'cat >> /root/.bash_profile << "EOF"
export LFS=/mnt/lfs
umask 022
EOF'

sudo bash -c 'cat >> /root/.bashrc << "EOF"

if [ -f /root/.bash_profile ]; then
. /root/.bash_profile
fi
EOF'

备注:使用sudo cat写入root配置文件需要用bash -c,参考 sudo cat << EOF > File doesn’t work, sudo su does 做法

2.7 Mounting the New Partition

为了重启后能自动挂载,在/etc/fstab文件中新增一行,启动时自动挂载文件系统/dev/sdb1到目录/mnt/lfs

1
2
3
4
5
6
7
8
9
10
luowanqian@LFS:~/Documents/Code/LFS$ cat /etc/fstab
# /etc/fstab: static file system information.
#
# Use 'blkid' to print the universally unique identifier for a
# device; this may be used with UUID= as a more robust way to name devices
# that works even if disks are added and removed. See fstab(5).
#
# <file system> <mount point> <type> <options> <dump> <pass>
# / was on /dev/sda2 during curtin installation
/dev/sdb1 /mnt/lfs ext4 defaults 1 1

挂载成功后,使用df查看挂载(见最后一行输出)

1
2
3
4
5
6
7
8
9
luowanqian@LFS:~/Documents/Code/LFS$ df -h
Filesystem Size Used Avail Use% Mounted on
tmpfs 776M 1.4M 774M 1% /run
/dev/sda2 49G 6.1G 41G 14% /
tmpfs 3.8G 0 3.8G 0% /dev/shm
tmpfs 5.0M 8.0K 5.0M 1% /run/lock
tmpfs 776M 96K 775M 1% /run/user/120
tmpfs 776M 104K 775M 1% /run/user/1000
/dev/sdb1 30G 24K 28G 1% /mnt/lfs

3. Packages and Patches

3.1 Introduction

本节内容主要是说明软件包下载事项:

  1. 下载教程中指定版本的软件包
  2. 下载release tar包而不是Git的snapshot

准备工作

  • 创建工作目录$LFS/sources,修改目录权限
1
2
3
4
luowanqian@LFS:~$ sudo mkdir -v $LFS/sources
mkdir: created directory '/mnt/lfs/sources'
luowanqian@LFS:~$ sudo chmod -v a+wt $LFS/sources
mode of '/mnt/lfs/sources' changed from 0755 (rwxr-xr-x) to 1777 (rwxrwxrwt)
1
wget https://www.linuxfromscratch.org/lfs/view/stable/wget-list-sysv
  • (可选)替换软件包下载地址为LFS mirror地址

LFS提供了一些mirror,见 https://www.linuxfromscratch.org/mirrors.html#files,网络不好可以设置软件包下载地址为LFS mirror地址。这里使用awk替换wget-list-sysv文件中的url

1
awk -F'/' '{print "https://mirrors.ustc.edu.cn/lfs/lfs-packages/12.3/" $NF}' wget-list-sysv > replaced-wget-list-sysv
  • 使用wget下载软件包到目录$LFS/sources
1
2
3
4
wget --input-file=wget-list-sysv --continue --directory-prefix=$LFS/sources

# 或者
wget --input-file=replaced-wget-list-sysv --continue --directory-prefix=$LFS/sources
  • 下载软件包的md5sums到目录$LFS/sources
1
wget -P $LFS/sources https://www.linuxfromscratch.org/lfs/view/stable/md5sums
  • 校验软件包,执行以下命令
1
2
3
pushd $LFS/sources
md5sum -c md5sums
popd
  • 设置软件包属主为root:root
1
sudo chown root:root $LFS/sources/*

4. Final Preparations

4.2 Creating a Limited Directory Layout in the LFS Filesystem

执行以下命令,在$LFS中创建一些子目录用构建

1
2
3
4
5
6
7
8
9
10
11
12
13
14
15
16
17
18
cat > prepare-dir.sh << "EOF"
#!/bin/bash

echo "LFS dir: $LFS"
mkdir -pv $LFS/{etc,var} $LFS/usr/{bin,lib,sbin}

for i in bin lib sbin; do
ln -sv usr/$i $LFS/$i
done

case $(uname -m) in
x86_64) mkdir -pv $LFS/lib64 ;;
esac

mkdir -pv $LFS/tools
EOF

sudo bash -i prepare-dir.sh

4.3 Adding the LFS User

  • 创建用户lfs
1
2
sudo groupadd lfs
sudo useradd -s /bin/bash -g lfs -m -k /dev/null lfs
  • 设置用户lfs密码
1
sudo passwd lfs
  • 设置$LFS下目录的属主为新创建的用户lfs
1
2
3
4
5
6
sudo su

chown -v lfs $LFS/{usr{,/*},var,etc,tools}
case $(uname -m) in
x86_64) chown -v lfs $LFS/lib64 ;;
esac
  • 切换到用户lfs
1
su - lfs

4.4 Setting Up the Environment

  • 切换到用户lfs,创建bash配置文件.bash_profile
1
2
3
cat > ~/.bash_profile << "EOF"
exec env -i HOME=$HOME TERM=$TERM PS1='\u:\w\$ ' /bin/bash
EOF

逻辑:当(1)以lfs用户登录系统(2)用su - lfs切换到lfs用户,initial shell是一个login shell,会依次读取/etc/profile~/.bash_profile。上面的.bash_profile此时会创建一个empty环境,只保HOMETERMPS1环境变量,然后切换到non-login shell,去执行~/.bashrc的配置

  • 创建.bashrc
1
2
3
4
5
6
7
8
9
10
11
12
cat > ~/.bashrc << "EOF"
set +h
umask 022
LFS=/mnt/lfs
LC_ALL=POSIX
LFS_TGT=$(uname -m)-lfs-linux-gnu
PATH=/usr/bin
if [ ! -L /bin ]; then PATH=/bin:$PATH; fi
PATH=$LFS/tools/bin:$PATH
CONFIG_SITE=$LFS/usr/share/config.site
export LFS LC_ALL LFS_TGT PATH CONFIG_SITE
EOF

逻辑:如果当前是non-login shell,则会执行~/.bashrc,不执行/etc/profile~/.bash_profile,因此.bashrc要设置构建需要的环境变量

  • 检查/etc/bash.bashrc是否存在,如果存在则需要将该文件换一个路径。切换到root用户
1
[ ! -e /etc/bash.bashrc ] || mv -v /etc/bash.bashrc /etc/bash.bashrc.NOUSE
  • 设置make的并发环境变量
1
2
3
cat >> ~/.bashrc << "EOF"
export MAKEFLAGS=-j$(nproc)
EOF
  • 载入bash配置
1
source ~/.bash_profile
  • 检查环境变量设置是否符合预期(每次重启登录lfs用户时都检查下)
1
2
3
4
5
6
7
8
9
10
11
12
13
lfs:~$ env
PWD=/home/lfs
HOME=/home/lfs
MAKEFLAGS=-j4
TERM=tmux-256color
SHLVL=1
PS1=\u:\w\$
LFS_TGT=x86_64-lfs-linux-gnu
LC_ALL=POSIX
LFS=/mnt/lfs
CONFIG_SITE=/mnt/lfs/usr/share/config.site
PATH=/mnt/lfs/tools/bin:/usr/bin
_=/usr/bin/env

4.5 About SBUs

只是一些构建时间说明

Important Preliminary Material

II. Toolchain Technical Notes

介绍交叉编译基础知识

III. General Compilation Instructions

在实操Chapter 5和Chapter 6内容之前,需要进行环境检查

  • 检查环境变量$LFS是否设置为/mnt/lfs
1
echo $LFS
  • 切换到lfs用户
1
su - lfs

5. Compiling a Cross-Toolchain

后续编译需要在$LFS/sources目录中进行

1
cd $LFS/sources/

5.2 Binutils-2.44 - Pass 1

  • 解压代码,创建构建目录
1
2
3
4
tar -xvf binutils-2.44.tar.xz
cd binutils-2.44
mkdir -v build
cd build
  • 编译
1
2
3
4
5
6
7
8
9
10
11
../configure --prefix=$LFS/tools \
--with-sysroot=$LFS \
--target=$LFS_TGT \
--disable-nls \
--enable-gprofng=no \
--disable-werror \
--enable-new-dtags \
--enable-default-hash-style=gnu

make
make install

5.3 GCC-14.2.0 - Pass 1

  • 解压gcc源码包
1
2
tar -xvf gcc-14.2.0.tar.xz
cd gcc-14.2.0
  • 解压GMP、MPFR和MPC代码到gcc目录中
1
2
3
4
5
6
tar -xf ../mpfr-4.2.1.tar.xz
mv -v mpfr-4.2.1 mpfr
tar -xf ../gmp-6.3.0.tar.xz
mv -v gmp-6.3.0 gmp
tar -xf ../mpc-1.3.1.tar.gz
mv -v mpc-1.3.1 mpc
  • On x86_64 hosts, set the default directory name for 64-bit libraries to “lib”:
1
2
3
4
5
6
case $(uname -m) in
x86_64)
sed -e '/m64=/s/lib64/lib/' \
-i.orig gcc/config/i386/t-linux64
;;
esac
  • 创建构建目录
1
2
mkdir -v build
cd build
  • 准备gcc编译
1
2
3
4
5
6
7
8
9
10
11
12
13
14
15
16
17
18
19
20
../configure                  \
--target=$LFS_TGT \
--prefix=$LFS/tools \
--with-glibc-version=2.41 \
--with-sysroot=$LFS \
--with-newlib \
--without-headers \
--enable-default-pie \
--enable-default-ssp \
--disable-nls \
--disable-shared \
--disable-multilib \
--disable-threads \
--disable-libatomic \
--disable-libgomp \
--disable-libquadmath \
--disable-libssp \
--disable-libvtv \
--disable-libstdcxx \
--enable-languages=c,c++
  • 编译安装gcc
1
2
make
make install
  • 拷贝limit.h。当前已在build目录中,需要cd到gcc源码目录
1
2
3
cd ..
cat gcc/limitx.h gcc/glimits.h gcc/limity.h > \
`dirname $($LFS_TGT-gcc -print-libgcc-file-name)`/include/limits.h

5.4 Linux-6.13.4 API Headers

  • 解压Linux kernel包
1
2
tar -xvf linux-6.13.4.tar.xz
cd linux-6.13.4
  • 预检查。LFS教程这步不太懂在干啥,先执行吧
1
make mrproper
  • 提取kernel headers,拷贝到$LFS/usr
1
2
3
make headers
find usr/include -type f ! -name '*.h' -delete
cp -rv usr/include $LFS/usr

第二步是删除usr/include除了*.h以外的文件,即只保留头文件

5.5 Glibc-2.41

  • 解压Glibc包
1
2
tar -xvf glibc-2.41.tar.xz
cd glibc-2.41
  • 创建符号链接
1
2
3
4
5
6
7
case $(uname -m) in
i?86) ln -sfv ld-linux.so.2 $LFS/lib/ld-lsb.so.3
;;
x86_64) ln -sfv ../lib/ld-linux-x86-64.so.2 $LFS/lib64
ln -sfv ../lib/ld-linux-x86-64.so.2 $LFS/lib64/ld-lsb-x86-64.so.3
;;
esac
  • 打补丁
1
patch -Np1 -i ../glibc-2.41-fhs-1.patch
  • 创建构建目录
1
2
mkdir -v build
cd build
  • Ensure that the ldconfig and sln utilities are installed into /usr/sbin
1
echo "rootsbindir=/usr/sbin" > configparms
  • 准备Glibc编译
1
2
3
4
5
6
7
8
../configure                             \
--prefix=/usr \
--host=$LFS_TGT \
--build=$(../scripts/config.guess) \
--enable-kernel=5.4 \
--with-headers=$LFS/usr/include \
--disable-nscd \
libc_cv_slibdir=/usr/lib
  • 编译
1
make
  • 安装Glibc
1
make DESTDIR=$LFS install
  • Fix a hard coded path to the executable loader in the ldd script
1
sed '/RTLDLIST=/s@/usr@@g' -i $LFS/usr/bin/ldd
  • 检查Glibc是否正确安装(必须检查通过
1
2
echo 'int main(){}' | $LFS_TGT-gcc -xc -
readelf -l a.out | grep ld-linux

正确安装Glibc,会看到以下输出

1
[Requesting program interpreter: /lib64/ld-linux-x86-64.so.2]

删除临时文件a.out

1
rm -v a.out

5.6 Libstdc++ from GCC-14.2.0

因为Libstdc++是gcc一部分,需要重新在gcc源码目录中构建

  • 进入gcc源码目录,重新创建构建目录
1
2
3
4
cd gcc-14.2.0
rm -rfv build
mkdir -v build
cd build
  • 准备Libstdc++编译
1
2
3
4
5
6
7
8
../libstdc++-v3/configure           \
--host=$LFS_TGT \
--build=$(../config.guess) \
--prefix=/usr \
--disable-multilib \
--disable-nls \
--disable-libstdcxx-pch \
--with-gxx-include-dir=/tools/$LFS_TGT/include/c++/14.2.0
  • 编译
1
make
  • 安装库

确保环境变量$LFS设置正确

1
make DESTDIR=$LFS install
  • Remove the libtool archive files because they are harmful for cross-compilation
1
rm -v $LFS/usr/lib/lib{stdc++{,exp,fs},supc++}.la

6. Cross Compiling Temporary Tools

后续编译需要在$LFS/sources目录中进行,同时确保当前用户为lfs

1
2
su - lfs
cd $LFS/sources/

6.2 M4-1.4.19

  • 解压M4源码包
1
2
tar -xvf m4-1.4.19.tar.xz
cd m4-1.4.19
  • 准备M4编译
1
2
3
./configure --prefix=/usr   \
--host=$LFS_TGT \
--build=$(build-aux/config.guess)
  • 编译安装
1
2
make
make DESTDIR=$LFS install

6.3 Ncurses-6.5

  • 解压Ncurses源码包
1
2
tar -xvf ncurses-6.5.tar.gz
cd ncurses-6.5
  • 构建“tic”程序
1
2
3
4
5
6
mkdir build
pushd build
../configure AWK=gawk
make -C include
make -C progs tic
popd
  • 准备Ncurses编译
1
2
3
4
5
6
7
8
9
10
11
12
./configure --prefix=/usr                \
--host=$LFS_TGT \
--build=$(./config.guess) \
--mandir=/usr/share/man \
--with-manpage-format=normal \
--with-shared \
--without-normal \
--with-cxx-shared \
--without-debug \
--without-ada \
--disable-stripping \
AWK=gawk
  • 编译
1
make
  • 安装
1
2
3
4
make DESTDIR=$LFS TIC_PATH=$(pwd)/build/progs/tic install
ln -sv libncursesw.so $LFS/usr/lib/libncurses.so
sed -e 's/^#if.*XOPEN.*$/#if 1/' \
-i $LFS/usr/include/curses.h

6.4 Bash-5.2.37

  • 解压Bash源码包
1
2
tar -xzvf bash-5.2.37.tar.gz
cd bash-5.2.37
  • 准备Bash编译
1
2
3
4
./configure --prefix=/usr                      \
--build=$(sh support/config.guess) \
--host=$LFS_TGT \
--without-bash-malloc
  • 编译安装
1
2
make
make DESTDIR=$LFS install
  • 创建sh链接
1
ln -sv bash $LFS/bin/sh

LFS End

完成LFS教程后,需要回滚的操作如下:

  1. 4.4节的/etc/bash.bashrc文件还原

背景

最近在做一个项目,使用一个公司内部开发的消息通信模块遇到了一个问题,就是进行本地socket通信,连接消息服务进程监听的一个端口时发现TCP连接始终建立不了,netstat查看端口始终处于SYN_SENT状态,当时花了好几天才最终定位出原因,是因为这个端口在iptables中设置了规则,只允许特定UID的进程能连接这个端口,由于没加规则,导致socket通信始终建立不起来。

经此一事,就反思后续这类问题该如何去定位,由于问题原因是由iptables导致的,所以在寻找有没有手段去分析数据包是否被拦截。

问题场景还原

问题场景描述

1、有A、B两个进程,B进程监听端口PortB

2、iptables设置了INPUT规则,任何发往端口PortB的数据包都会被丢弃(DROP)

3、A进程调用connect接口连接 127.0.0.1 的端口PortB,netstat命令查看端口PortB的连接,状态始终为SYN_SENT

问题场景构造

1、分别构造一个client和server程序,client连接server特定端口,这里从网上找了一个python写的client-server程序 tcp_sixteen.py,程序默认连接1060端口。

1)启动server,执行

1
python3 tcp_sixteen.py server 127.0.0.1

2)启动client,执行

1
python3 tcp_sixteen.py client 127.0.0.1

client会向server发送一个消息,server收到消息后会返回一个响应。server端输出如下:

client端输出如下:

由图可知,client端 (127.0.0.1, 41292) 连接server端 (127.0.0.1, 1060)。client端的端口是任意的,server端的端口固定是1060

2、新增一条iptables的filter表INPUT规则,拦截传给端口1060的数据包,执行命令

1
sudo iptables -A INPUT -p tcp --dport 1060 -j DROP

可以查看当前filter表的规则

1
sudo iptables -t filter -L -v -n --line-numbers

已新增一条规则:丢弃(DROP)所有发往1060端口的数据包

3、再一次执行client,向server发送消息,此时由于iptables规则,client发送消息超时

使用netstat查看端口1060的连接情况,发现有个连接127.0.0.1:59346 -> 127.0.0.1:1060一直处于SYN_SENT状态,说明iptables规则生效了,已还原问题场景

1
sudo netstat -tunalp | grep :1060

问题定位

预备知识

由于涉及到iptables使用,需要了解关键概念:表Table、链Chain,还有使用iptables的TRACE功能,需要设置并查看跟踪日志。这些预备知识可以参考下面文章进行学习:

  1. ArchLinux Wiki: iptables
  2. Chapter 6. Traversing of tables and chains
  3. 鸟哥私房菜:7.2.2 iptables的表格(table)与链(chain)
  4. 数据包如何游走于 Iptables 规则之间?

IPTables Trace

要定位是否由iptables设置的规则拦截导致的,这里需要用到iptables的TRACE功能。要使用TRACE功能,首先需要了解一个数据包从client发往server,需要经过iptables哪些表和链

搬一张ArchLinux Wiki的iptables教程中的图

由上图可以看到,本节点进程A发数据包给同节点的进程B,需要经过的表和链如下:

1、进程A发出数据包(从图中 Local Process 节点开始)

  1. Local Process
  2. Routing Decision
  3. raw表OUTPUT链
  4. mangle表OUTPUT链
  5. nat表OUTPUT链
  6. filter表OUTPUT链
  7. Routing Decision
  8. mangle表POSTROUTING链
  9. nat表POSTROUTING链
  10. NETWORK

2、发往进程B的数据包(从图中最顶端的节点 NETWORK开始)

  1. NETWORK
  2. raw表PREROUTING链
  3. mangle表PREROUTING链
  4. nat表PREROUTING链
  5. Routing Decision
  6. mangle表INPUT链
  7. filter表INPUT链
  8. Local Process

TRACE功能只能在iptables的raw表中使用,需要在raw表的链中添加规则,跟踪特定数据包,输出其经过的表和链到日志中,通过分析日志可以知道哪些规则拦截了数据包

可以看出,本节点进程A和B间的TCP通信会经过raw表的OUTPUT、PREROUTING链,可以在其中一个新增trace规则进行数据包跟踪

Trace Packet

在raw表OUTPUT链中新增目的端口1060的trace规则,执行以下命令

1
sudo iptables -t raw -A OUTPUT -p tcp --dport 1060 -j TRACE

再次执行client,向server发消息,使用netstat查看端口1060连接情况

client尝试从端口55714发送TCP请求给端口1060,但是都没收到server的ACK。这时可以查看内核日志,grep下trace关键字

1
sudo dmesg | grep -i trace

trace规则抓到日志如下

1
2
3
4
5
6
7
8
9
10
11
12
13
// 第一次TCP请求
[ 7579.448153] TRACE: raw:OUTPUT:policy:2 IN= OUT=lo SRC=127.0.0.1 DST=127.0.0.1 LEN=60 TOS=0x00 PREC=0x00 TTL=64 ID=48009 DF PROTO=TCP SPT=55714 DPT=1060 SEQ=3916344369 ACK=0 WINDOW=65495 RES=0x00 SYN URGP=0 OPT (0204FFD70402080A3E7182C20000000001030307) UID=1000 GID=1000
[ 7579.448160] TRACE: filter:OUTPUT:policy:1 IN= OUT=lo SRC=127.0.0.1 DST=127.0.0.1 LEN=60 TOS=0x00 PREC=0x00 TTL=64 ID=48009 DF PROTO=TCP SPT=55714 DPT=1060 SEQ=3916344369 ACK=0 WINDOW=65495 RES=0x00 SYN URGP=0 OPT (0204FFD70402080A3E7182C20000000001030307) UID=1000 GID=1000
[ 7579.448167] TRACE: raw:PREROUTING:policy:1 IN=lo OUT= MAC=00:00:00:00:00:00:00:00:00:00:00:00:08:00 SRC=127.0.0.1 DST=127.0.0.1 LEN=60 TOS=0x00 PREC=0x00 TTL=64 ID=48009 DF PROTO=TCP SPT=55714 DPT=1060 SEQ=3916344369 ACK=0 WINDOW=65495 RES=0x00 SYN URGP=0 OPT (0204FFD70402080A3E7182C20000000001030307)
[ 7579.448169] TRACE: filter:INPUT:rule:1 IN=lo OUT= MAC=00:00:00:00:00:00:00:00:00:00:00:00:08:00 SRC=127.0.0.1 DST=127.0.0.1 LEN=60 TOS=0x00 PREC=0x00 TTL=64 ID=48009 DF PROTO=TCP SPT=55714 DPT=1060 SEQ=3916344369 ACK=0 WINDOW=65495 RES=0x00 SYN URGP=0 OPT (0204FFD70402080A3E7182C20000000001030307)

// 第二次TCP请求
[ 7580.449767] TRACE: raw:OUTPUT:policy:2 IN= OUT=lo SRC=127.0.0.1 DST=127.0.0.1 LEN=60 TOS=0x00 PREC=0x00 TTL=64 ID=48010 DF PROTO=TCP SPT=55714 DPT=1060 SEQ=3916344369 ACK=0 WINDOW=65495 RES=0x00 SYN URGP=0 OPT (0204FFD70402080A3E7186AC0000000001030307) UID=1000 GID=1000
[ 7580.449955] TRACE: filter:OUTPUT:policy:1 IN= OUT=lo SRC=127.0.0.1 DST=127.0.0.1 LEN=60 TOS=0x00 PREC=0x00 TTL=64 ID=48010 DF PROTO=TCP SPT=55714 DPT=1060 SEQ=3916344369 ACK=0 WINDOW=65495 RES=0x00 SYN URGP=0 OPT (0204FFD70402080A3E7186AC0000000001030307) UID=1000 GID=1000
[ 7580.450133] TRACE: raw:PREROUTING:policy:1 IN=lo OUT= MAC=00:00:00:00:00:00:00:00:00:00:00:00:08:00 SRC=127.0.0.1 DST=127.0.0.1 LEN=60 TOS=0x00 PREC=0x00 TTL=64 ID=48010 DF PROTO=TCP SPT=55714 DPT=1060 SEQ=3916344369 ACK=0 WINDOW=65495 RES=0x00 SYN URGP=0 OPT (0204FFD70402080A3E7186AC0000000001030307)
[ 7580.450137] TRACE: filter:INPUT:rule:1 IN=lo OUT= MAC=00:00:00:00:00:00:00:00:00:00:00:00:08:00 SRC=127.0.0.1 DST=127.0.0.1 LEN=60 TOS=0x00 PREC=0x00 TTL=64 ID=48010 DF PROTO=TCP SPT=55714 DPT=1060 SEQ=3916344369 ACK=0 WINDOW=65495 RES=0x00 SYN URGP=0 OPT (0204FFD70402080A3E7186AC0000000001030307)

// ..... 多次重复TCP请求

日志中关键字段:

  1. 源端口Source Port:关键字SPT=
  2. 目的端口Destination Port:关键字DPT=
  3. 经过的规则:关键字TRACE: xxx表:xxx链:<policy|rule>:规则ID

从第一次TCP请求日志可以获取到以下信息:

  1. TCP请求源端口为55714,目的端口为1060

  2. 经过的规则顺序为:

    1. raw表OUTPUT链policy 2
    2. filter表OUTPUT链policy 1
    3. raw表PREROUTING链policy 1
    4. filter表INPUT链rule 1

可以分析出从端口55714发送的TCP请求最终只走到filter表INPUT链的规则1,说明这个规则可能导致TCP请求未发到server端。通过iptables命令查看这个规则:

1
sudo iptables -t filter -L -v -n --line-numbers

规则1刚好就是之前新增的拦截规则,至此可以得出结论是由于filter表的INPUT规则导致TCP请求未成功发送

想在Github上搭建一个简易的个人Blog,Hexo是一个不错的选择。Hexo是一个快速、简洁的博客框架,使用Markdown解析文章,在几秒内就可以生成静态网页,然后就可以部署在Github上生成个人网站。

Read more »

问题描述

Given a linked list, return the node where the cycle begins. If there is no cycle, return null.

To represent a cycle in the given linked list, we use an integer pos which represents the position (0-indexed) in the linked list where tail connects to. If pos is -1, then there is no cycle in the linked list.

Note: Do not modify the linked list.

Example 1:

1
2
3
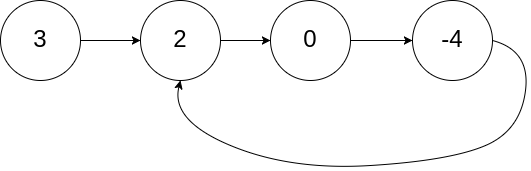
Input: head = [3,2,0,-4], pos = 1
Output: tail connects to node index 1
Explanation: There is a cycle in the linked list, where tail connects to the second node.

Example 2:

1
2
3
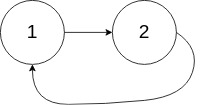
Input: head = [1,2], pos = 0
Output: tail connects to node index 0
Explanation: There is a cycle in the linked list, where tail connects to the first node.

Example 3:

1
2
3
Input: head = [1], pos = -1
Output: no cycle
Explanation: There is no cycle in the linked list.

Follow-up:

Can you solve it without using extra space?

Related Topics: Linked List, Two Pointers

原问题: 142. Linked List Cycle II

中文翻译版: 142. 环形链表 II

解决方案

解决方案1

用一个 Set 保存已访问的节点,此时可以遍历整个链表并返回第一个出现重复的节点。时间复杂度为 O(n),空间复杂度为 O(n)

参考解题代码
1
2
3
4
5
6
7
8
9
10
11
12
13
14
15
16
17
18
19
20
21
22
23
24
25
26
/**
* Definition for singly-linked list.
* struct ListNode {
* int val;
* ListNode *next;
* ListNode(int x) : val(x), next(NULL) {}
* };
*/
class Solution {
public:
ListNode *detectCycle(ListNode *head) {
set<ListNode*> node_set;
ListNode *node;

node = head;
while (node != NULL) {
if (node_set.find(node) == node_set.end())
node_set.insert(node);
else
return node;
node = node->next;
}

return node;
}
};

解决方案2

方案2是 LeetCode 141 解题思路的进一步改进,算法分为两个阶段:

  • 阶段1 : 首先使用快指针 fast 和慢指针 slow 遍历链表,如果链表有环,两指针最终会相遇到某个节点
  • 阶段2 : 初始化额外的两个指针,ptr1 指向链表的头节点,ptr2 指向相遇节点。然后,我们每次将它们往前移动一步,直到它们相遇,它们相遇的点就是环的入口,返回这个节点

关于阶段2的实现原理,这里提供一个不错的解答说明:LeetCode: 环形链表 II 官方解答

参考解题代码
1
2
3
4
5
6
7
8
9
10
11
12
13
14
15
16
17
18
19
20
21
22
23
24
25
26
27
28
29
30
31
32
33
34
35
36
/**
* Definition for singly-linked list.
* struct ListNode {
* int val;
* ListNode *next;
* ListNode(int x) : val(x), next(NULL) {}
* };
*/
class Solution {
public:
ListNode *detectCycle(ListNode *head) {
if (NULL == head || NULL == head->next)
return NULL;

ListNode *slow, *fast;

slow = fast = head;
while (fast != NULL && fast->next != NULL) {
slow = slow->next;
fast = fast->next->next;
if (slow == fast)
break;
}
// no cycle
if (slow != fast)
return NULL;

slow = head;
while (slow != fast) {
slow = slow->next;
fast = fast->next;
}

return fast;
}
};

问题描述

Design a stack that supports push, pop, top, and retrieving the minimum element in constant time.

  • push(x) – Push element x onto stack.
  • pop() – Removes the element on top of the stack.
  • top() – Get the top element.
  • getMin() – Retrieve the minimum element in the stack.

Example 1:

1
2
3
4
5
6
7
8
9
10
11
12
13
14
15
16
Input
["MinStack","push","push","push","getMin","pop","top","getMin"]
[[],[-2],[0],[-3],[],[],[],[]]

Output
[null,null,null,null,-3,null,0,-2]

Explanation
MinStack minStack = new MinStack();
minStack.push(-2);
minStack.push(0);
minStack.push(-3);
minStack.getMin(); // return -3
minStack.pop();
minStack.top(); // return 0
minStack.getMin(); // return -2

Constraints:

  • Methods pop, top and getMin operations will always be called on non-empty stacks.

Related Topics: Stack, Design

原问题: 155. Min Stack

中文翻译版: 155. 最小栈

解决方案

可以使用两个栈解决该题,一个栈stack存储push进来的数据,另一个栈min_stack存储现有数据的最小值,两个栈存储同等数量的元素。关键的操作 push 实现如下:

  • push : push的数据为x,如果x小于min_stack栈顶的值,说明x比现用元素值都要小,则将x压入min_stack,否则将min_stack栈顶的值压入min_stack
参考解题代码
1
2
3
4
5
6
7
8
9
10
11
12
13
14
15
16
17
18
19
20
21
22
23
24
25
26
27
28
29
30
31
32
33
34
35
36
37
38
39
40
class MinStack {
private:
stack<int> m_stack;
stack<int> m_min_stack;

public:
/** initialize your data structure here. */
MinStack() {

}

void push(int x) {
if (m_stack.empty()) {
m_stack.push(x);
m_min_stack.push(x);
} else {
int top = m_min_stack.top();

if (top > x)
m_min_stack.push(x);
else
m_min_stack.push(top);

m_stack.push(x);
}
}

void pop() {
m_stack.pop();
m_min_stack.pop();
}

int top() {
return m_stack.top();
}

int getMin() {
return m_min_stack.top();
}
};

1. 问题描述

Reverse a singly linked list.

Example:

1
2
Input: 1->2->3->4->5->NULL
Output: 5->4->3->2->1->NULL

Follow up:

A linked list can be reversed either iteratively or recursively. Could you implement both?

Related Topics: Linked List

原问题: 206. Reverse Linked List

中文翻译版: 206. 反转链表

2. 解决方案

2.1 非递归

非递归的解决方案是按原始顺序迭代节点,并将它们逐个移动到链表的头部。以下举个例子进行说明

黑色节点23是原始头节点。

  1. 首先,我们将黑色节点的下一个节点(即节点6)移动到链表的头部:

  2. 然后,我们将黑色节点的下一个节点(即节点15)移动到链表的头部:

  3. 黑色结点的下一个结点现在是空。因此,我们停止这一过程并返回新的头结点15

从以上流程可以知道该算法的时间复杂度为 O(N),空间复杂度为 O(1)

参考解题代码
1
2
3
4
5
6
7
8
9
10
11
12
13
14
15
16
17
18
19
20
21
22
23
24
/**
* Definition for singly-linked list.
* struct ListNode {
* int val;
* ListNode *next;
* ListNode(int x) : val(x), next(NULL) {}
* };
*/
class Solution {
public:
ListNode* reverseList(ListNode* head) {
ListNode *cur, *next;

cur = head;
while (cur != NULL && cur->next != NULL) {
next = cur->next;
cur->next = next->next;
next->next = head;
head = next;
}

return head;
}
};

2.2 递归

用递归解此题时,此时递归的函数返回的是反转链表后的新的头节点 new_head,进行整合时,只需要将头节点 head 添加到反转链表的尾部即可。拿前面例子来说,头节点23后部分都已经反转完毕,此时链表构造为

1
23 -> 6 <- 15

此时 new_head 指向节点15,head 指向节点23,要将节点23添加到反转链表尾部,执行以下操作即可:

1
2
head->next->next = head
head->next = NULL

经过以上操作以后,链表构造变为

1
NULL <- 23 <- 6 <- 15

最后返回新的头节点 new_head 即可

参考解题代码
1
2
3
4
5
6
7
8
9
10
11
12
13
14
15
16
17
18
19
20
21
22
23
/**
* Definition for singly-linked list.
* struct ListNode {
* int val;
* ListNode *next;
* ListNode(int x) : val(x), next(NULL) {}
* };
*/
class Solution {
public:
ListNode* reverseList(ListNode* head) {
if (head == NULL || head->next == NULL)
return head;

ListNode *new_head;

new_head = reverseList(head->next);
head->next->next = head;
head->next = NULL;

return new_head;
}
};

问题描述

Given a singly linked list, group all odd nodes together followed by the even nodes. Please note here we are talking about the node number and not the value in the nodes.

You should try to do it in place. The program should run in O(1) space complexity and O(nodes) time complexity.

Example 1:

1
2
Input: 1->2->3->4->5->NULL
Output: 1->3->5->2->4->NULL

Example 2:

1
2
Input: 2->1->3->5->6->4->7->NULL
Output: 2->3->6->7->1->5->4->NULL

Note:

  • The relative order inside both the even and odd groups should remain as it was in the input.
  • The first node is considered odd, the second node even and so on …

Related Topics: Linked List

原问题: 328. Odd Even Linked List

中文翻译版: 328. 奇偶链表

解决方案

解此题主要需要两个指针 odd 以及 evenodd 指向奇节点,even 指向偶节点。odd 从第一个节点开始遍历,even 从第二节点开始遍历,两个指针每次移动都是移动两个节点,每次移动前,先将 next 字段指向下下个节点,即

1
2
odd = odd->next->next;
even = even->next->next;

这样当两个指针遍历完链表时,链表刚好被分为两部分,odd 指向奇节点链表最后一个节点,此时将这两个链表拼在一起即可。偶节点链表头部是头节点的下一个节点,由于在指针遍历时,会破坏链表结构,因此在遍历前先保存该节点 node,链表拼接时只需

1
odd->next = node
参考解题代码
1
2
3
4
5
6
7
8
9
10
11
12
13
14
15
16
17
18
19
20
21
22
23
class Solution {
public:
ListNode* oddEvenList(ListNode* head) {
if (head == NULL || head->next == NULL)
return head;

ListNode *even, *odd, *node;

odd = head;
even = head->next;
node = head->next;
while (odd != NULL && odd->next != NULL
&& even != NULL && even->next != NULL) {
odd->next = odd->next->next;
odd = odd->next;
even->next = even->next->next;
even = even->next;
}
odd->next = node;

return head;
}
};

问题描述

Remove all elements from a linked list of integers that have value val.

Example:

1
2
Input:  1->2->6->3->4->5->6, val = 6
Output: 1->2->3->4->5

Related Topics: Linked List

原问题: 203. Remove Linked List Elements

中文翻译版: 203. 移除链表元素

解决方案

链表删除基本操作的实现,使用三个指针 prevcurr 以及 nextprev 指向 curr 前一个节点,curr 指向要删除的节点,next 指向 curr 下一个节点。curr 从头节点开始遍历,按照链表删除元素操作依次删除值为 val 的节点即可

1
2
3
4
next = curr->next;
prev->next = next;
delete curr;
curr = next;

这里要注意的是头节点,如果头节点的值刚好 val,这个删除操作和上面的代码片段有少许区别

参考解题代码
1
2
3
4
5
6
7
8
9
10
11
12
13
14
15
16
17
18
19
20
21
22
23
24
25
class Solution {
public:
ListNode* removeElements(ListNode* head, int val) {
ListNode *prev, *curr, *next;

prev = NULL;
curr = head;
while (curr != NULL) {
if (curr->val == val) {
next = curr->next;
if (prev == NULL)
head = next;
else
prev->next = next;
delete curr;
curr = next;
} else {
prev = curr;
curr = curr->next;
}
}

return head;
}
};